Pro Tip: If you are managing a Windows Server 2019+ environment, OpenSSH is native. However, for most Linux-based remote management, PuTTY remains the industry standard for stability and feature set.
Establishing a secure connection to your Linux instance using PuTTY is a foundational skill for any cloud administrator. This guide will walk you through preparing your credentials, configuring your security gates, and launching your first secure session.
Prerequisites for Success
Before attempting to connect, ensure your environment meets these essential criteria:
- Instance Readiness: Your EC2 instance must have passed its 2/2 status checks. Initial boot typically takes 2-5 minutes.
- Security Groups: Ensure the associated AWS security group allows Inbound SSH (Port 22) traffic from your specific public IPv4 address.
- Access Credentials: You must have the private key file (
.pem) associated with the key pair selected during instance launch.
Step 1: Convert Your Private Key (PEM to PPK)
AWS issues private keys in .pem format, but PuTTY natively requires .ppk (PuTTY Private Key) format. We will use the included PuTTYgen utility for this precise conversion.

- Open PuTTYgen (part of the standard PuTTY suite).
- Under Type of key to generate, confirm RSA is selected (or SSH-2 RSA depending on your version).
- Click Load. Note: Switch the file browser to "All Files (*.*)" to locate your
.pemfile.

- Select your imported key and click OK on the success dialog.
- Choose Save private key. We highly recommend entering a Key passphrase for an added layer of encryption.
- Save the resulting
.ppkfile in a safe, persistent directory.
Step 2: Configure Your PuTTY Session
With your .ppk key ready, you can now configure the SSH parameters in the main PuTTY client.
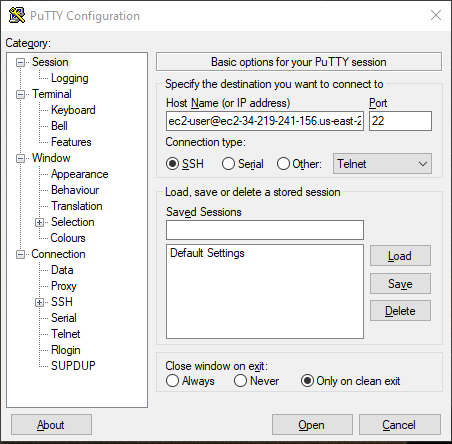
- Launch PuTTY.
- Host Name: Enter
user_name@instance_public_dnsor your instance's Public IP.
Common default users:ec2-user(Amazon Linux),ubuntu(Ubuntu), oradmin(Debian). - Verify Port is
22and Connection type isSSH.
Loading the Key File
- In the Category pane, navigate to Connection > SSH > Auth > Credentials.
- Click Browse next to Private key file for authentication and select your
.ppkfile. - (Optional) Return to Session, type a name in Saved Sessions, and click Save for one-click access in the future.
3. Launching and Troubleshooting
Click Open to start the session. If this is your first time connecting, a "Security Alert" will appear regarding the host key fingerprint. Click Accept to trust the connection.
Stay Connected: To prevent your session from timing out, go to Connection and set "Seconds between keepalives" to 60.
Quick Solution Matrix
If you encounter warnings or failures, consult this immediate resolution matrix:
❌ Connection Refused
Usually means Port 22 isn't open in your AWS Security Group. Verify your Inbound Rules.
❌ Disconnected: No supported authentication
Double-check that you are using the correct username for your OS and that the .ppk file matches the instance's key pair.